Following my talk at the Virtual Azure Community Day, I received a lot of questions about how to validate Kubernetes deployments before their actual deployment to the cluster. In this, the final chapter of my series about my adventures with Gatekeeper on the Azure Kubernetes Service (AKS), I’m going to look at testing.
In Part 1, I told you all about Rego, the domain-specific language (DSL) used by Open Policy Agent (OPA). In Part 2, I explained how to set up and use Gatekeeper to enforce policies in a cluster and in Part 3, I showed you how easy it is to enable Azure Policy for Kubernetes on an Azure Kubernetes cluster.
Today, I will show you how Conftest can help you to test your Kubernetes configuration using your continuous integration tools and can provide quick feedback to the teams deploying your application on a Kubernetes cluster. In the examples given below I’ve used AKS, but you can apply these steps to any Kubernetes cluster.
What is Conftest?
Conftest is a tool to help you write tests against structured data such as JSON and YAML. You could, for example, write tests for a Kubernetes configuration, Terraform code or Serverless configuration. In our examples today, I’ll show you how to test Kubernetes YAML files.
Conftest relies on the Rego language from OPA for assertion writing. You can read more about Rego in Part 1 of this series.
Installing Conftest on your system is easy as there are many options to choose from depending on your setup. I chose to use the Brew installation option to install Conftest on OSX. At the time of writing, I’m working with Conftest version 0.23.0.
 ❯ conftest --version
Version: 0.23.0
Sharing is caring
To make sure that everyone has access to shared policies, they need to be stored in a central location. While you might think about storing the policies in a git repository at first, this could become difficult if you later do want to restrict access (something I have seen in large enterprises). Storing policies as artifacts gives you more control.
Luckily, Conftest supports storing Rego policies in an OCI-compliant registry. Rego policies are stored in the registry using the bundle format specified by OPA.
To make this work, Conftest utilizes ORAS. ORAS, or OCI Registry As Storage, is an initiative created by Microsoft to support pushing artifacts to OCI-compliant registries. Currently, only two registries support ORAS, namely the Docker distribution and the Azure Container Registry (ACR).
For the demo, I will create a new ACR:
az acr create -g rego-demo -n regodemostore --sku Basic
az acr login --name regodemostore
With the ACR created and authenticated, we will be able to push the policies to the registry. I’ll utilize the Conftest ‘push’ command to do so. To make it work, you have to be in the polices root folder.
 ❯ conftest push regodemostore.azurecr.io/policies
pushing bundle to: regodemostore.azurecr.io/policies
pushed bundle with digest: sha256:6cbf1a0e2d17c66fd8ec3e5e88f2b0720aac1868ca670c26a4c0cfa17a7e93dc
After the push is successful, you will find the policies in the Azure Portal under the ACR repositories overview. It will show you the tag and the time and date of the last upload.

Testing locally
Now, let’s say you are part of a team developing policies. These policies will extend the company-wide policies developed by the security team.
Based on the above steps, you can pull them from the ACR.
❯ conftest pull regodemostore.azurecr.io/policies
blob no name: sha256:44136fa355b3678a1146ad16f7e8649e94fb4fc21fe77e8310c060f61caaff8a
The ‘pull’ command, by default, pulls policies into the policy directory.
 ❯ tree
.
└── policy
    ├── allowedrepos.rego
    ├── allowedrepos_test.rego
    ├── requiredlabels.rego
    └── requiredlabels_test.rego
As you can see, the security team’s policies are now ready to be extended by your team’s additional policies. However, before we start to work, let’s be safe and verify the work of the security team. You can do this by running the ‘verify’ command that is part of Conftest.
❯ conftest verify policy

27 tests, 27 passed, 0 warnings, 0 failures, 0 exceptions
We have now validated the policies and they are ready to use.
Automating with CI/CD
As our demo code is already published on GitHub, I’m going to use GitHub Actions to automate our policy verification.
With GitHub Actions you can build end-to-end continuous integration (CI) and continuous deployment (CD) capabilities directly in your repository. GitHub Actions powers GitHub’s built-in continuous integration service.
You start by creating a directory called .github/workflows in your project root. In that directory, you then create a YAML file. This file contains the job and the associated actions the build pipeline will execute to build and push the container.
 ❯ tree .github
.github
└── workflows
    └── conftest.yaml
A Workflow for Conftest
Workflows are custom automated processes that you can set up in your repository to build, test, package, release, or deploy any code project on GitHub.
For our workflow, we use the default GitHub agent. This agent comes with a lot of tools but Conftest is not included. To be able to run Conftest, we need to make sure it’s installed. To do this, we need to download the latest source from GitHub and unpack it to a location we can add to the system PATH.
- name: install conftest
  run: |
    wget https://github.com/open-policy-agent/conftest/releases/download/v0.23.0/conftest_0.23.0_Linux_x86_64.tar.gz
    tar xzf conftest_0.23.0_Linux_x86_64.tar.gz
    mkdir -p $HOME/.local/bin
    mv conftest $HOME/.local/bin
    echo "$HOME/.local/bin" >> $GITHUB_PATH
Now that we have the Conftest executable available, we can continue to checkout the code that we need to validate. We can do this by using the checkout action. This clones the repository to the runner that is executing the workflow.
- name: checkout code
  uses: actions/checkout@v2
With the policy code available in the runner, we can continue to validate the policies. As we add the executable to the PATH, we don’t have to do anything special to call the conftest executable. We can now run the conftest verify policy as a shell command.
- name: validate
  run: |
    conftest verify policy
Now, putting everything together, you get to the following workflow file.
name: conftest

on:
  push:
    branches:
      - main
  pull_request:
    branches:
      - main

jobs:
  validate:
    name: validate
    runs-on: ubuntu-latest
    steps:
      - name: install conftest
        run: |
          wget https://github.com/open-policy-agent/conftest/releases/download/v0.23.0/conftest_0.23.0_Linux_x86_64.tar.gz
          tar xzf conftest_0.23.0_Linux_x86_64.tar.gz
          mkdir -p $HOME/.local/bin
          mv conftest $HOME/.local/bin
          echo "$HOME/.local/bin" >> $GITHUB_PATH

      - name: checkout code
        uses: actions/checkout@v2

      - name: validate
        run: |
          conftest verify policy
When we push this to GitHub, the workflow will be picked up automatically and run as we have specified when we push it to the main branch. You can see how this looks by visiting the GitHub Actions page on my Rego demo repository.
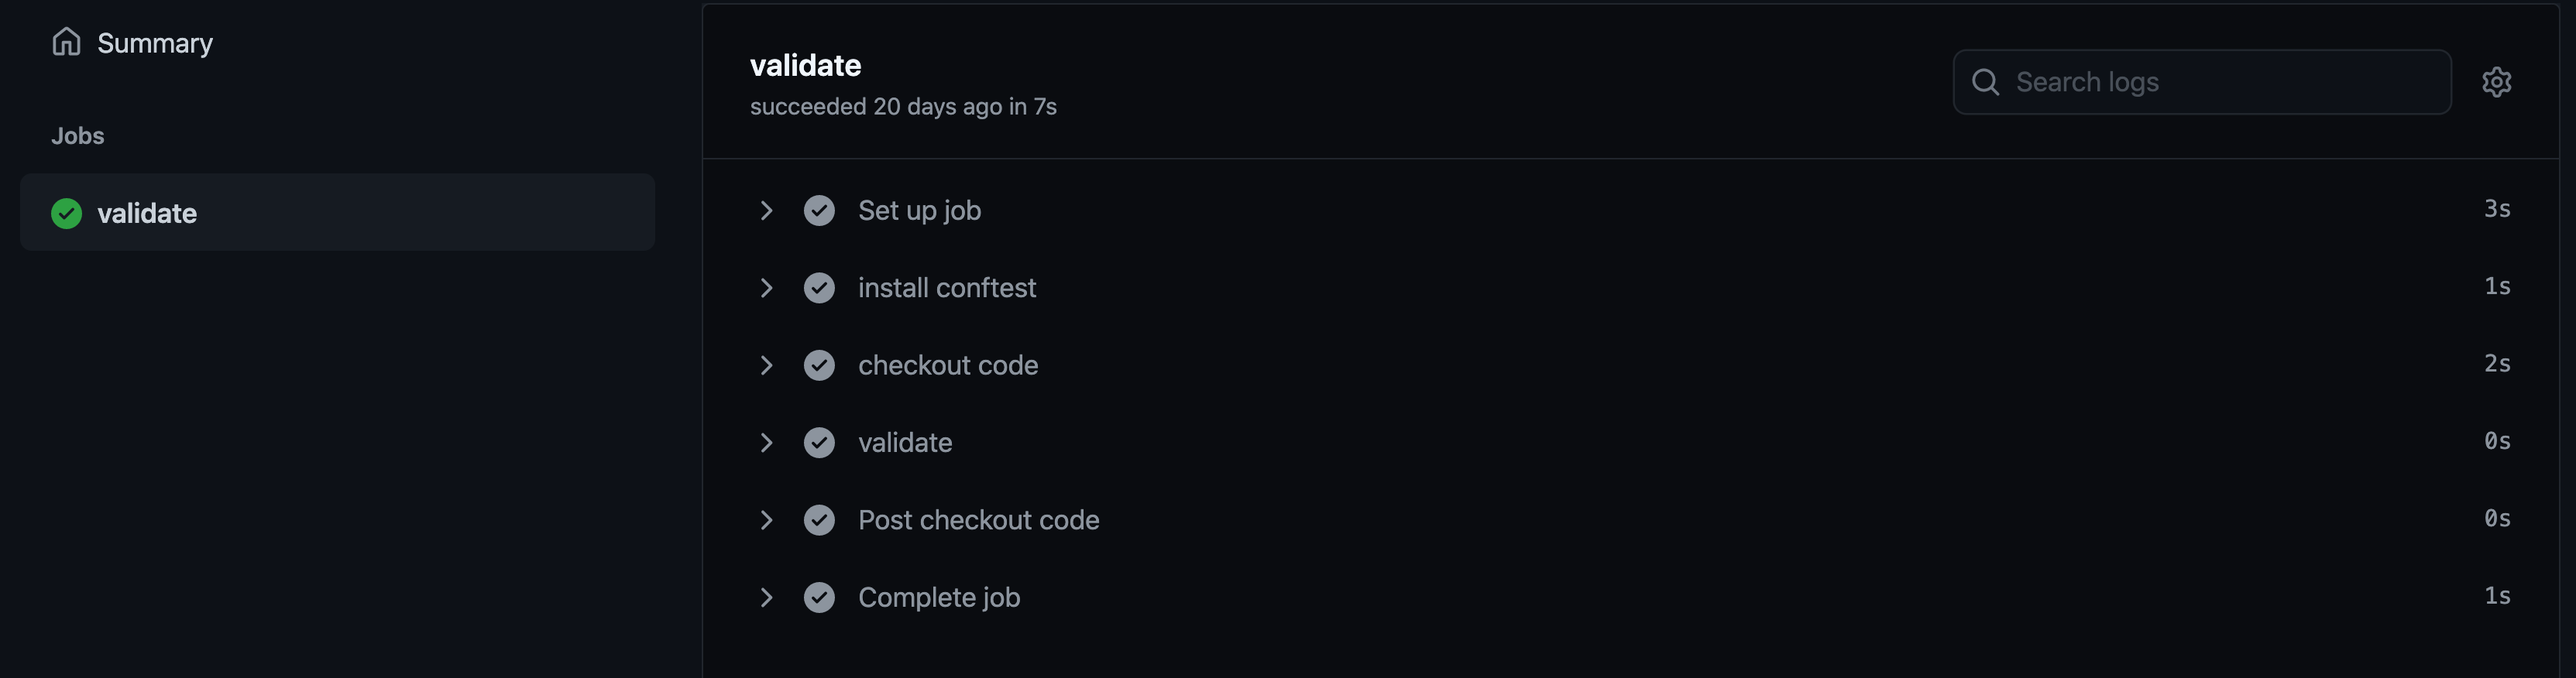
When you click on a workflow run, you’ll see some details about it (e.g., the way it was triggered, the time it took, and its status) and can continue to the job details by clicking on its name. In the job overview, you can see all the steps defined above and can click on each step to view the log output, should you need to.
Wrap up
I personally think Conftest is a great tool in the OPA landscape that will simplify your work with policies and Rego files.
Your security team will be able to publish their Rego files on a platform where engineers can conduct their checks. Then, the application teams can use the work of both teams from a central, versioned location to validate their compliance and even contribute their own checks, if needed.
With this final chapter, I hope to have demonstrated ways you can start sharing policies in your organization and enable teams to move faster while still complying with organizational standards.
To conclude, in Part 4 of this series, you learned to use Conftest to validate policies and integration and apply GitHub Actions to automate the process. If you would like to learn more about the Rego policy language itself, please check out Part 1.
If you have found this article useful, please consider recommending and sharing it with your friends.
If you have any questions or feedback, let me know on Twitter.